Organizational Structures in Construction Projects: Choosing the Right Framework for Success
Construction projects represent some of the most complex endeavors in the business world, requiring the coordination of diverse skills, resources, and stakeholders. The organizational structure chosen for a construction project can significantly impact its efficiency, communication effectiveness, and ultimately, its success. Understanding the different types of organizational structures and their applications in construction is essential for project managers, architects, and construction professionals.
This article examines the three primary project organizational structures—functional, matrix, and projectized—analyzing their characteristics, advantages, limitations, and specific relevance to construction projects.
Table of Contents
The Foundation of Project Organization
Before diving into specific organizational structures, it’s important to understand what a project organizational structure is and why it matters in construction.
Project Organizational Structure Figure 1: The components of a project organizational structure
A project organizational structure defines how authority, responsibility, and communication channels are arranged within a project. It determines:
Who makes decisions at various levels
How information flows between team members
How resources are allocated and managed
Where accountability lies for different aspects of the project
In construction projects, where multiple trades, contractors, consultants, and stakeholders must work together seamlessly, the organizational structure becomes particularly critical to project success.
Functional Organizational Structure
The functional organizational structure is the traditional hierarchical arrangement where employees are grouped by their specialization or department.
Key Characteristics:
Specialists are grouped by discipline (structural engineering, electrical, plumbing, etc.)
Clear departmental boundaries exist
Team members report to functional managers rather than project managers
Project work is performed within functional departments
Functional Organization Chart Figure 2: Functional organizational structure in a construction context
Advantages in Construction Projects:
Technical Excellence: Concentrates specialists together, fostering technical depth and mentorship
Resource Efficiency: Allows for efficient sharing of specialized resources across multiple projects
Career Development: Provides clear career paths within technical disciplines
Standardization: Promotes consistent methods and standards within each discipline
Limitations in Construction Projects:
Coordination Challenges: Can create silos between disciplines, complicating cross-functional coordination
Divided Loyalty: Team members may prioritize departmental objectives over project goals
Slow Response Time: Decision-making may be delayed due to hierarchical approval processes
Limited Project Focus: The project as a whole may receive less attention than departmental concerns
Application in Construction:
The functional structure works best for:
Small, routine construction projects
Organizations handling multiple similar projects simultaneously
Projects where specialized technical expertise is paramount
Internal company renovations or facilities upgrades
For example, a large architectural firm might use a functional structure to organize its staff into departments for conceptual design, detailed design, technical documentation, and construction administration.
Matrix Organizational Structure
The matrix structure combines elements of both functional and project-oriented organizations, creating a dual reporting relationship for team members.
Key Characteristics:
Team members report to both functional managers and project managers
Resources are shared across projects while maintaining departmental homes
Authority is balanced between project and functional managers
Varying degrees of matrix intensity exist (weak, balanced, strong)
Matrix Organization Types Figure 3: Comparison of weak, balanced, and strong matrix structures
The table below illustrates how authority is distributed in different matrix intensities:
Aspect
Weak Matrix
Balanced Matrix
Strong Matrix
Project Manager’s Role
Coordinator or Expediter
Project Manager with limited authority
Project Manager with significant authority
Resource Control
Functional Manager
Shared
Project Manager
Team Dedication
Part-time on project
Mix of part-time and full-time
Mostly full-time
Administrative Staff
None or minimal
Some dedicated
Dedicated project administrative staff
Budget Control
Functional department
Shared
Project Manager
Advantages in Construction Projects:
Balanced Expertise: Maintains technical strength while focusing on project objectives
Efficient Resource Utilization: Allows sharing of specialized resources across projects
Flexible Response: Can adapt to varying project requirements
Enhanced Communication: Creates formal channels between functional areas
Client Focus: Greater attention to project and client needs than purely functional structures
Limitations in Construction Projects:
Dual Authority: Can create confusion about priorities and reporting relationships
Complex Management: Requires sophisticated management skills to navigate dual authority
Potential Conflicts: May generate tension between project and functional priorities
Resource Competition: Multiple project managers may compete for limited resources
Application in Construction:
The matrix structure is ideal for:
Medium to large construction projects
Organizations running multiple diverse projects simultaneously
Projects requiring specialized expertise from various disciplines
Situations where balancing standardization with project focus is important
For example, a construction management firm might use a matrix structure where structural engineers report to both their engineering department head and to the project managers of specific construction projects.
Projectized Organizational Structure
In a projectized structure, the organization is arranged entirely around projects, with team members dedicated fully to specific projects under the authority of project managers.
Key Characteristics:
Project team members report directly to the project manager
Resources are dedicated to specific projects
Project managers have high authority and autonomy
Team is assembled specifically for the project and often disbanded upon completion
Projectized Organization Chart Figure 4: Projectized organizational structure for a large construction project
Advantages in Construction Projects:
Strong Project Focus: Complete alignment with project objectives
Clear Authority: Single point of authority reduces confusion
Efficient Communication: Direct communication within the project team
Rapid Response: Decisions can be made quickly without navigating multiple departments
Team Cohesion: Fosters strong team identity and commitment to project goals
Limitations in Construction Projects:
Resource Inefficiency: Possible duplication of resources across projects
Technical Isolation: Specialists may become disconnected from their technical disciplines
Career Uncertainty: Team members may face uncertainty at project completion
Inconsistent Practices: Different projects may develop different methodologies
Application in Construction:
The projectized structure works best for:
Large, complex construction projects
High-stakes projects with specific critical requirements
Projects with long durations that justify dedicated teams
Situations where client focus and responsiveness are paramount
For example, a major airport expansion project might use a projectized structure with a dedicated team including designers, engineers, construction managers, and specialists fully assigned to that single project.
Selecting the Appropriate Structure for Construction Projects
Choosing the right organizational structure for a construction project depends on several factors:
Size and Complexity: Larger, more complex projects typically benefit from stronger project focus (matrix or projectized)
Duration: Longer projects may justify more dedicated structures
Uniqueness: Highly unique projects benefit from projectized approaches
Stability of Requirements: Projects with changing requirements need flexible structures
Organizational Factors:
Existing Structure: The organization’s current structure influences what’s practical to implement
Multiple Projects: Organizations handling many simultaneous projects may prefer functional or matrix structures
Technical Depth Requirements: Higher technical complexity may favor functional or matrix approaches
Client Relationships: Client-focused projects often benefit from projectized or strong matrix structures
The following table provides guidelines for structure selection:
Project Characteristic
Recommended Structure
Small, routine projects
Functional
Medium-sized projects with specific technical requirements
Weak/Balanced Matrix
Large projects with moderate technical complexity
Strong Matrix
Major, complex, high-profile projects
Projectized
Multiple similar projects
Functional or Weak Matrix
Projects requiring high innovation
Balanced Matrix or Projectized
Hybrid Approaches in Construction
In practice, many construction organizations adopt hybrid approaches that combine elements of different organizational structures to meet specific needs:
Project-Functional Hybrids: Dedicated project management with functional support teams
Regional-Project Structures: Combining geographic units with project-specific teams
Client-Centered Structures: Organizing around major clients with multiple projects
Phase-Adaptive Structures: Changing structure as the project moves through different phases
Conclusion
The choice of organizational structure significantly impacts how construction projects are managed, resourced, and executed. Each structure—functional, matrix, and projectized—offers distinct advantages and limitations that make it suitable for different project scenarios.
Functional structures excel in maintaining technical expertise and standardization but may struggle with cross-discipline coordination. Matrix structures balance functional excellence with project focus but introduce complexity in authority relationships. Projectized structures maximize project focus and responsiveness but may sacrifice efficiency and technical development.
For construction professionals, understanding these structural options provides a foundation for creating effective project organizations. By carefully matching organizational structure to project characteristics, construction firms can optimize their approach to project delivery and increase their chances of project success.
Ultimately, the most successful construction organizations demonstrate adaptability in their organizational approach, selecting and customizing structures based on project requirements rather than forcing all projects into a single organizational mold. This flexibility, combined with clear communication about roles and responsibilities, helps ensure that the chosen structure supports rather than hinders project execution.
By making informed choices about organizational structure, construction professionals can create environments where teams work efficiently, communication flows effectively, and projects achieve their objectives of time, cost, and quality.
Tender Evaluation Excellence: Mastering Comparative Statements and Pre-Bid Meetings
In the competitive landscape of construction project procurement, effective tender evaluation and management are critical skills that can significantly impact project success. Two key elements of this process—tender comparative statements and pre-bid meetings—serve as essential tools for project owners and consultants to make informed decisions and ensure clarity among all stakeholders.
Table of Contents
Understanding Tender Comparative Statements
A tender comparative statement (TCS) is a structured document that organizes and presents bid information from multiple contractors in a standardized format, enabling side-by-side evaluation and informed decision-making. It transforms complex bid data into a digestible format that facilitates objective assessment.
Key Components of Effective Tender Comparative Statements
Creating a comprehensive tender comparative statement requires careful consideration of several critical elements:
1. Technical Comparison Parameters
The technical aspects of a tender comparative statement focus on the qualitative elements of the proposals:
Compliance with Specifications: How well each bidder meets the technical requirements specified in the tender documents.
Methodology and Approach: Evaluation of the proposed execution strategies and their suitability for the project.
Quality Management Systems: Assessment of quality assurance and control mechanisms proposed by bidders.
Resource Allocation: Comparison of equipment, materials, and human resources allocated to the project.
Project Schedule: Analysis of proposed timelines and their feasibility.
A well-structured technical comparison allows you to visualize which contractors understand the project requirements and have proposed appropriate technical solutions.
2. Financial Aspects
The financial components form the quantitative backbone of the comparative statement:
Bid Price Analysis: Comparison of total bid amounts and unit rates.
Price Breakdown Structure: Detailed analysis of how costs are distributed across project components.
Alternative Proposals: Evaluation of any cost-saving alternatives suggested by bidders.
Advance and Payment Terms: Comparison of proposed payment schedules and advance requirements.
Escalation Clauses: Assessment of price adjustment provisions.
Financial comparison requires careful normalization to ensure you’re comparing equivalent offerings. For example, if one contractor includes certain items as provisional sums while another includes them in the base price, adjustments must be made for fair comparison.
3. Qualification Criteria
Beyond technical and financial aspects, qualification factors help assess the capability and reliability of bidders:
Experience in Similar Projects: Comparison of relevant project history.
Financial Stability: Assessment of financial statements and capacity.
Available Resources: Evaluation of equipment fleet, technical personnel, and other resources.
Track Record: Analysis of past performance, including timely completion and quality of work.
Compliance with Legal Requirements: Verification of licenses, certifications, and statutory compliance.
Sample Tender Comparative Statement Structure
Evaluation Criteria
Bidder A
Bidder B
Bidder C
Remarks
Technical Parameters
Compliance with specifications
85%
95%
80%
Bidder B provides most comprehensive compliance
Methodology
Good
Excellent
Satisfactory
Bidder B offers innovative approach for foundation work
Project Schedule
12 months
10 months
14 months
Bidder B proposes shortest timeline
Financial Aspects
Base Bid Amount
₹2.1 Cr
₹2.3 Cr
₹1.9 Cr
Bidder C offers lowest price
Unit Rate (Concrete/m³)
₹6,500
₹6,800
₹6,200
Rates normalized for same grade
Payment Terms
Monthly
Milestone
Monthly
Different payment structures require cash flow analysis
Qualification Criteria
Similar Projects
5
8
3
Bidder B has most relevant experience
Financial Capacity
Good
Excellent
Satisfactory
Based on turnover and banking references
Resource Availability
Adequate
Excellent
Limited
Equipment and personnel assessment
Best Practices for Preparing Tender Comparative Statements
Standardize Format: Create a uniform template to ensure all bids are evaluated using the same criteria.
Weight Criteria Appropriately: Assign importance weights to different evaluation factors based on project priorities.
Normalize Data: Adjust for differences in how bidders present information to ensure fair comparison.
Document Assumptions: Clearly note any assumptions made during the comparative analysis.
Use Visual Aids: Incorporate graphs and charts to highlight key differences between bidders.
The Critical Role of Pre-Bid Meetings
Pre-bid meetings represent a vital opportunity for direct interaction between the project owner/consultant and potential bidders before bid submission. These meetings serve multiple purposes that significantly enhance the tender process.
Purpose and Benefits of Pre-Bid Meetings
1. Clarity on Project Requirements
Pre-bid meetings allow project owners to:
Provide additional context beyond what’s in the tender documents
Highlight critical aspects of the project that require special attention
Demonstrate site conditions through site visits
Explain complex technical requirements
For bidders, these meetings offer the chance to:
Gain deeper understanding of project objectives
Clarify ambiguities in the tender documents
Better understand the client’s priorities and concerns
2. The Clarification Process
The clarification process during pre-bid meetings follows a structured approach:
Initial Presentation: The project team presents an overview of the project, highlighting key aspects.
Question Submission: Bidders submit questions in writing, either in advance or during the meeting.
Response Provision: Responses are provided during the meeting and documented.
Discussion: Open discussion on critical aspects that may require further elaboration.
Site Visit: Often follows the meeting to give bidders firsthand knowledge of site conditions.
This process ensures that all bidders receive the same information, maintaining the principle of equal treatment.
3. Documentation Requirements
Proper documentation of pre-bid meetings is essential for transparency and future reference:
Minutes of Meeting: Detailed record of discussions, clarifications, and decisions.
Attendance Register: Documentation of participating companies and representatives.
Clarification Responses: Formal responses to all questions raised.
Addenda Issuance: Any changes to tender documents resulting from the meeting.
All documentation should be distributed to all bidders, including those who couldn’t attend, ensuring information equity.
Pre-Bid Meeting Timeline in the Tender Process
The typical timeline positions pre-bid meetings strategically within the tender process:
Tender Advertisement: Initial announcement of the project
Tender Document Distribution: Release of bid documents to interested parties
Study Period: 1-2 weeks for bidders to review documents
Pre-Bid Meeting: Conducted approximately at the midpoint of the bidding period
Addenda Issuance: Within 1 week after the pre-bid meeting
Bid Preparation: Remaining time for bidders to prepare their offers
Bid Submission: Final deadline for tender submission
This timeline ensures bidders have adequate time to incorporate clarifications into their proposals.
Synergy Between Comparative Statements and Pre-Bid Meetings
While these two elements serve different functions in the tender process, they work synergistically:
Improved Bid Quality: Effective pre-bid meetings lead to better-informed bids, which in turn makes the comparative statement more meaningful.
Reduced Need for Assumptions: Clarifications during pre-bid meetings minimize the need for bidders to make assumptions, resulting in more comparable proposals.
Enhanced Evaluation Criteria: Questions raised during pre-bid meetings often highlight aspects that should be emphasized in the comparative statement.
Documentation Continuity: Minutes from pre-bid meetings provide context for evaluating certain aspects of the bids in the comparative statement.
Conclusion
Mastering the preparation of tender comparative statements and effectively conducting pre-bid meetings are essential skills for construction project management professionals. These tools, when properly implemented, significantly enhance transparency, fairness, and effectiveness in the contractor selection process.
For tender comparative statements, the key lies in comprehensive inclusion of technical, financial, and qualification parameters, presented in a format that facilitates objective comparison. For pre-bid meetings, success depends on thorough preparation, clear communication, and proper documentation.
Together, these elements create a robust tender evaluation process that minimizes risks and maximizes the likelihood of selecting the most suitable contractor for your project—a critical factor in overall project success.
[This article is for educational purposes only and does not constitute professional advice. For specific guidance on implementing tender evaluation processes, please consult with qualified construction management professionals.]
Management Levels in Construction Projects: Roles and Responsibilities
Construction projects are highly complex, requiring a well-defined organizational structure to ensure efficiency and accountability. Within this structure, different management levels play distinct roles, from strategic decision-making to on-site execution. Understanding these levels is crucial for effective project delivery and team coordination.
This article explores the three core management levels in construction—strategic, tactical, and operational—along with their roles, responsibilities, and interdependencies.
Table of Contents
The Three Core Management Levels in Construction
The hierarchy of management in construction projects can be broadly categorized into three levels:
Strategic Level Management: Focused on long-term goals and overall project direction.
Tactical Level Management: Responsible for translating strategic objectives into actionable plans.
Operational Level Management: Handles day-to-day execution of tasks on-site.
Each level has unique responsibilities, authority, and communication requirements.
1. Strategic Level Management
At the top of the hierarchy, strategic management focuses on defining the project’s vision and aligning it with organizational goals.
Key Roles:
Board of Directors
Chief Executive Officer (CEO)
Project Sponsors
Responsibilities:
Decision-Making: Approving project charters, budgets, and timelines.
Goal Setting: Establishing long-term objectives aligned with organizational strategy.
Resource Allocation: Allocating financial and human resources across projects.
Stakeholder Engagement: Managing relationships with investors, clients, and regulatory bodies.
Example:
For a large infrastructure project like building a metro system, strategic managers would:
Approve a $1 billion budget.
Set sustainability goals (e.g., reducing carbon emissions by 20%).
Engage with government agencies for permits and funding.
2. Tactical Level Management
Tactical managers act as intermediaries between strategic leaders and operational teams. They focus on planning and coordination to ensure that strategic objectives are met.
Key Roles:
Project Managers
Department Heads (e.g., Engineering, Procurement)
Responsibilities:
Project Planning: Developing detailed schedules, budgets, and resource plans.
Risk Management: Identifying risks and implementing mitigation strategies.
Team Coordination: Assigning tasks to operational teams and ensuring alignment.
Performance Monitoring: Tracking progress against key performance indicators (KPIs).
Example:
In a commercial building project:
The project manager creates a detailed schedule using tools like Primavera or MS Project.
The engineering head ensures that designs comply with local building codes.
Procurement managers secure materials within budget constraints.
3. Operational Level Management
Operational management is responsible for executing tasks on-site according to the plans developed by tactical managers.
Key Roles:
Site Supervisors
Foremen
Quality Control Inspectors
Responsibilities:
Task Execution: Completing construction activities such as excavation, framing, or finishing.
Resource Utilization: Managing labor, materials, and equipment efficiently.
Quality Assurance: Ensuring work meets specified standards through inspections.
Safety Compliance: Implementing safety protocols to minimize risks.
Example:
For a residential housing development:
Site supervisors oversee daily construction activities like pouring concrete foundations.
Foremen assign tasks to workers based on skillsets.
Quality inspectors verify that materials meet specifications before use.
Communication Channels Across Levels
Effective communication is critical for seamless coordination between management levels. Each level relies on specific communication methods:
Level
Communication Focus
Methods Used
Strategic
High-level updates on progress & risks
Reports, board meetings
Tactical
Detailed plans & performance metrics
Weekly progress reviews, dashboards
Operational
Task-specific instructions & feedback
Daily briefings, site walk-throughs
Communication Breakdown Example
Image Courtesy: Hewage, Kasun & Ruwanpura, Janaka. (2009). A novel solution for construction on-site communication – The information booth. Canadian Journal of Civil Engineering. 36. 659-671. 10.1139/L09-026. DOI
Figure 1: How information flows between management levels in construction projects
Interdependencies Between Levels
The three levels of management are interdependent. Success at one level relies heavily on the effectiveness of the others:
Strategic → Tactical:
Strategic decisions set the framework for tactical planning (e.g., budget constraints influence resource allocation).
Tactical → Operational:
Tactical plans provide the roadmap for operational teams to execute tasks efficiently.
Operational → Strategic:
Feedback from operational teams informs strategic adjustments (e.g., delays due to weather may require timeline extensions).
Challenges in Managing Construction Levels
Despite their importance, managing these levels effectively comes with challenges:
Common Issues:
Misaligned Goals:
Strategic objectives may not translate well into actionable tasks at the operational level.
Communication Gaps:
Delayed or unclear communication can lead to errors or inefficiencies.
Resource Conflicts:
Competition for limited resources between projects can hinder progress at all levels.
Solutions:
Establish clear reporting structures using tools like Responsibility Assignment Matrices (RAM).
Implement integrated project management software (e.g., Procore) for real-time updates across levels.
Conduct regular cross-level meetings to align goals and resolve conflicts.
Practical Application in Construction Projects
Consider a high-rise office building project:
Strategic managers approve a $50 million budget and set sustainability targets (e.g., LEED certification).
Tactical managers develop a detailed plan outlining milestones like foundation completion within six months.
Operational teams execute daily tasks such as excavation while adhering to safety protocols.
By maintaining clear communication and accountability across all levels, the project achieves its goals without exceeding budget or timeline constraints.
Conclusion
The success of construction projects depends significantly on how well different management levels function together. Strategic leaders provide direction and resources; tactical managers convert those directives into actionable plans; operational teams execute tasks on-site to deliver results.
For students and professionals in construction management, understanding these roles is essential for effective leadership and collaboration. By mastering the interdependencies between these levels and addressing common challenges through structured communication and planning tools, construction teams can consistently achieve project success while meeting stakeholder expectations.
Pre-qualification in Construction Tenders: Process and Benefits for Contractor Selection
In the complex world of construction project management, selecting the right contractor is a decision that can make or break a project. The pre-qualification system serves as a critical filtering mechanism that helps project owners identify capable contractors before the formal bidding process begins. This systematic approach to contractor evaluation has become an essential component of modern construction procurement strategies.
Table of Contents
Understanding the Pre-qualification System
Pre-qualification is a preliminary screening process used to assess potential contractors’ capabilities and establish their eligibility to participate in tender opportunities. This process happens before the actual bidding phase and aims to create a shortlist of qualified contractors who have demonstrated the necessary expertise, resources, and financial stability to undertake the project successfully.
The Purpose of Pre-qualification
The pre-qualification system serves several important purposes in construction tender evaluation:
Quality Assurance: Ensures that only competent contractors with proven track records participate in the bidding process.
Risk Reduction: Minimizes the risk of project failure by filtering out contractors who lack the necessary capabilities or financial stability.
Process Efficiency: Streamlines the tender evaluation process by reducing the number of bids that need detailed evaluation.
Resource Optimization: Saves time and resources for both the client and potential contractors by identifying suitable candidates early.
Compliance Verification: Ensures contractors meet all statutory and regulatory requirements before being invited to bid.
The Pre-qualification Process: A Step-by-Step Approach
The pre-qualification process typically follows a structured approach that allows for systematic evaluation of potential contractors. Let’s examine each step in detail:
1. Preparation of Pre-qualification Criteria
The first step involves establishing clear and relevant criteria for evaluation. These criteria typically include:
Technical Capability: Previous experience in similar projects, technical expertise, qualified personnel.
The evaluation phase involves thorough assessment of submitted documents against the established criteria:
Scoring System: Many organizations use a weighted scoring system to objectively evaluate contractors.
Threshold Requirements: Minimum scores or mandatory requirements that must be met.
Verification Process: Cross-checking provided information through references, site visits, or interviews.
5. Shortlisting of Qualified Contractors
Based on the evaluation results, a shortlist of qualified contractors is prepared:
Ranking: Contractors may be ranked based on their scores.
Classification: Some systems classify contractors into categories based on their capabilities and project size they can handle.
Notification: All applicants are notified of the results, with qualified contractors invited to participate in the tender process.
Pre-qualification Documentation Requirements
The pre-qualification process relies heavily on proper documentation to make informed decisions. Key documentation requirements include:
1. Technical Documentation
Project Experience: Detailed information about similar projects completed in the past 5-10 years.
Technical Resources: List of equipment, technologies, and technical personnel.
Quality Management: Documentation of quality control systems and processes.
Methodologies: Standard operating procedures and technical approaches.
2. Financial Documentation
Audited Financial Statements: Typically for the past 3-5 years.
Bank References: Letters from banking institutions confirming financial standing.
Credit Ratings: Reports from recognized credit rating agencies.
Financial Capacity: Evidence of access to credit facilities and working capital.
3. Legal and Compliance Documentation
Business Registration: Certificates of incorporation or business registration.
Tax Compliance: Tax clearance certificates and registration numbers.
Insurance Policies: Professional indemnity, contractor’s all-risk, workmen’s compensation.
Litigation History: Disclosure of ongoing or past legal disputes.
How Pre-qualification Enhances Contractor Selection
The pre-qualification system significantly improves contractor selection in several ways:
1. Risk Mitigation
Pre-qualification serves as an effective risk management tool by:
Identifying Financial Risks: Screening out contractors with inadequate financial capacity reduces the risk of project abandonment or cash flow issues.
Reducing Technical Risks: Ensuring contractors have the necessary expertise minimizes the risk of quality issues or technical failures.
Mitigating Legal Risks: Verifying legal compliance reduces the likelihood of regulatory problems during project execution.
2. Quality Assurance Aspects
The system contributes to quality assurance through:
Performance Track Record: Evaluation of past project performance helps predict future performance.
Capability Verification: Confirmed technical and managerial capabilities increase confidence in project quality.
Standards Compliance: Verification of adherence to industry standards and best practices.
3. Benefits of Pre-qualification for Project Success
Pre-qualification offers numerous benefits that contribute to project success:
For Clients/Owners:
Higher Quality Bids: Receives proposals from qualified contractors only.
Reduced Evaluation Workload: Fewer but higher quality bids to evaluate.
Lower Project Risk: Minimized chance of contractor failure during project execution.
Better Value for Money: Qualified contractors typically deliver better long-term value despite potentially higher initial costs.
For Contractors:
Reduced Competition: Compete against similarly qualified contractors rather than a wider pool.
Better Resource Allocation: Can focus resources on opportunities where they are truly competitive.
Recognition of Capabilities: Formal acknowledgment of their qualifications and expertise.
Relationship Building: Opportunity to showcase capabilities to potential clients.
Pre-qualification Challenges and Solutions
While pre-qualification offers many benefits, it also presents certain challenges:
Common Challenges
Subjective Evaluation: Risk of bias or inconsistency in evaluating qualifications.
Excessive Requirements: Overly stringent criteria may limit competition unnecessarily.
Administrative Burden: Significant paperwork and evaluation effort required.
Market Limitation: May exclude new or smaller contractors with potential.
Practical Solutions
Standardized Evaluation Frameworks: Implement consistent scoring systems with multiple evaluators.
Proportionate Requirements: Match qualification requirements to project complexity and size.
Digital Pre-qualification Systems: Use electronic platforms to streamline document submission and evaluation.
Dynamic Pre-qualification: Implement ongoing contractor qualification rather than project-by-project evaluation.
Best Practices in Pre-qualification Systems
To maximize the effectiveness of pre-qualification processes, consider these best practices:
Transparency: Clear communication of criteria, evaluation methods, and results.
Objectivity: Use of quantifiable metrics wherever possible to reduce subjectivity.
Proportionality: Requirements proportionate to the size, complexity, and risk of the project.
Verification: Thorough validation of submitted information through references and site visits.
Continuous Improvement: Regular review and refinement of pre-qualification systems based on outcomes.
Conclusion
The pre-qualification system represents a crucial first step in the contractor selection process for construction projects. By systematically evaluating potential contractors’ capabilities before the formal bidding process, project owners can significantly enhance their chances of project success while reducing risks.
The comprehensive evaluation of technical capabilities, financial stability, past performance, and organizational capacity enables informed decision-making and creates a foundation for successful project delivery. While the process requires significant effort and resources, the benefits in terms of risk mitigation, quality assurance, and project success make it a worthwhile investment for construction projects of all sizes.
For construction professionals and students, understanding both the process of pre-qualification and its benefits in contractor selection provides valuable insights into one of the most critical aspects of construction project management.
[This article is for educational purposes only and does not constitute professional advice. For specific guidance on implementing pre-qualification systems, please consult with qualified construction management professionals.]
Analyzing Construction Project Failures: Common Causes and Success Strategies
Construction projects are complex endeavors that require careful coordination of numerous elements, from resources and stakeholders to schedules and budgets. Despite advances in project management methodologies, construction projects continue to face significant challenges, with many experiencing delays, cost overruns, or even complete failure. Understanding why projects fail is the first step toward implementing effective strategies to ensure success.
This comprehensive analysis explores the common causes of construction project failures and provides practical measures that project managers can implement to improve project outcomes.
Table of Contents
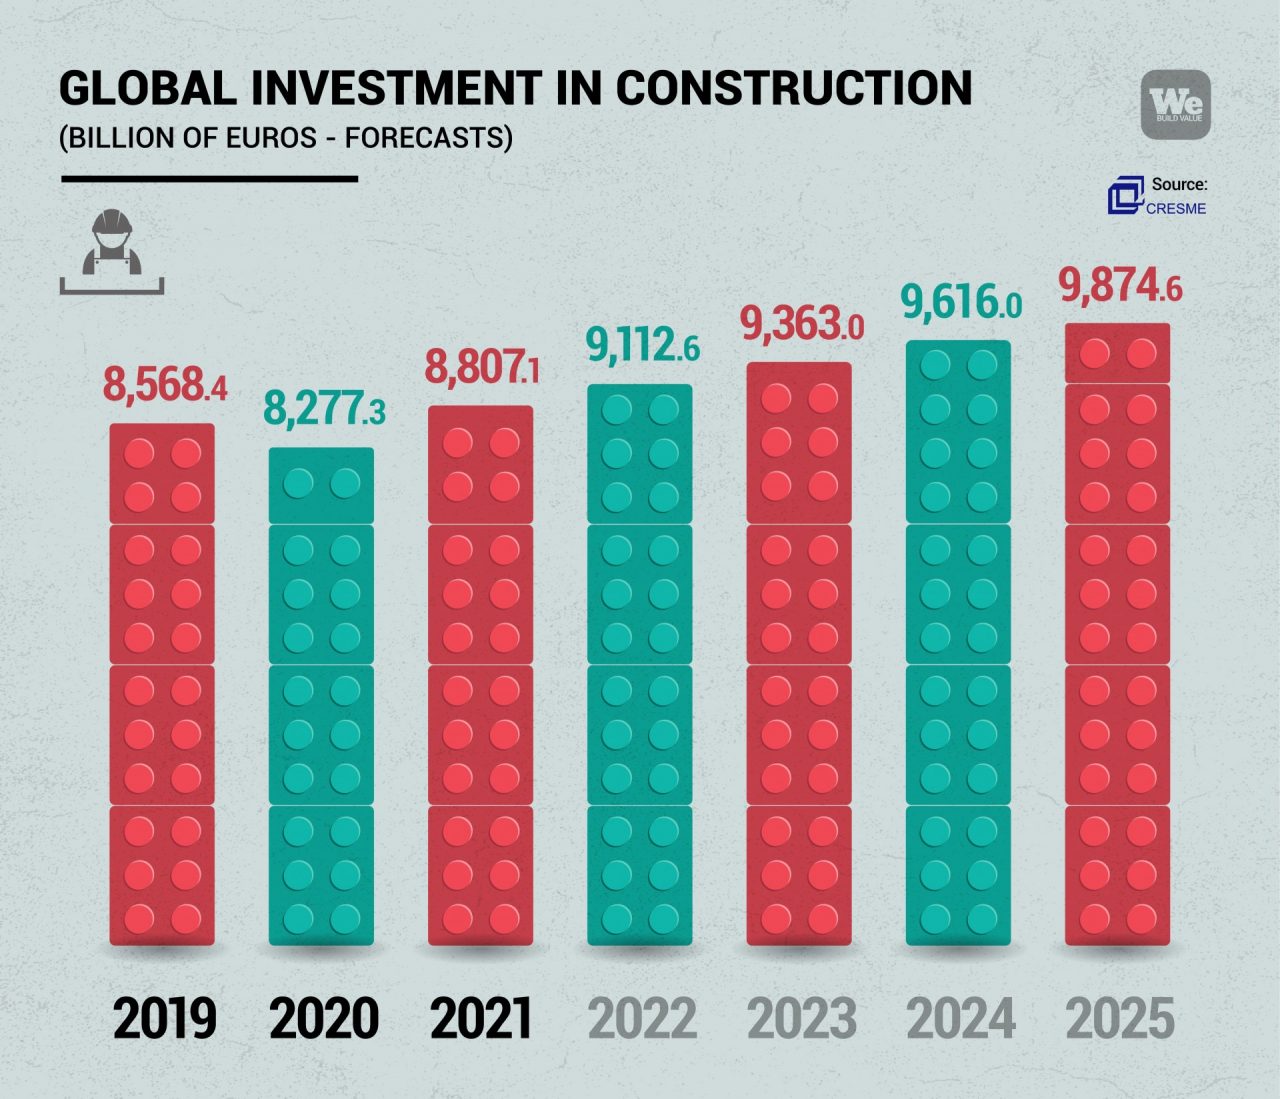
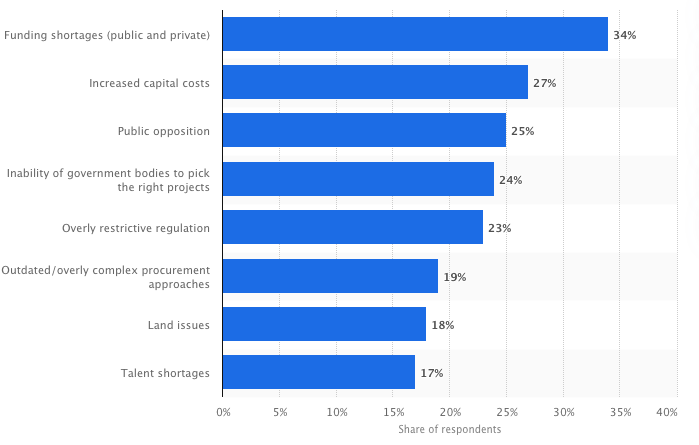
The State of Construction Project Performance
Before diving into specific failure causes, it’s important to understand the scope of the problem. According to industry research:
Approximately 70% of construction projects experience schedule delays
Nearly 64% exceed their budgets
Only about 25% fully achieve their original objectives
Figure 1: Performance statistics of construction projects worldwide
These statistics highlight the significant challenges facing the construction industry and underscore the importance of understanding and addressing the root causes of project failures.
Common Causes of Construction Project Failures
1. Poor Planning and Scheduling
Inadequate planning is perhaps the most significant contributor to project failures. When projects begin with unrealistic timelines, incomplete scope definitions, or insufficient resource planning, they’re setting themselves up for challenges from day one.
Key Planning and Scheduling Issues:
Inadequate Scope Definition: Failing to clearly define project requirements and deliverables
Unrealistic Schedules: Setting overly optimistic timelines without proper consideration of constraints
Inaccurate Resource Estimation: Underestimating the time, labor, materials, or equipment needed
Insufficient Activity Sequencing: Failing to properly identify dependencies between activities
Lack of Contingency Planning: Not allowing buffer time for unexpected delays or challenges
The consequences of poor planning cascade throughout the project lifecycle, leading to rushed work, resource conflicts, quality issues, and ultimately, schedule and budget overruns.
2. Inadequate Risk Management
Construction projects face numerous risks, from weather delays and material shortages to labor disputes and regulatory complications. Failure to identify, assess, and mitigate these risks significantly increases the likelihood of project disruptions.
Common Risk Management Deficiencies:
Limited Risk Identification: Failing to recognize potential threats to the project
Superficial Risk Analysis: Not thoroughly evaluating the probability and impact of identified risks
Reactive Approach: Addressing risks only after they materialize rather than proactively planning
Insufficient Contingency Reserves: Inadequate time and budget allowances for risk events
Poor Risk Communication: Failing to inform stakeholders about identified risks and mitigation plans
Figure 2: Sample risk assessment matrix for construction projects
3. Stakeholder Communication Issues
Construction projects involve numerous stakeholders with varying interests, expectations, and communication needs. When communication breaks down, misunderstandings, conflicts, and coordination issues inevitably follow.
Key Stakeholder Communication Challenges:
Unclear Expectations: Failing to establish shared understanding of project goals and requirements
Information Silos: Restricting information flow between project teams and stakeholders
Inadequate Reporting: Not providing timely and appropriate updates on project status
Poor Meeting Management: Ineffective project meetings that don’t resolve issues or drive actions
Cultural and Technical Barriers: Communication obstacles due to different backgrounds or expertise
A McKinsey study found that effective stakeholder communication can improve project performance by up to 25%, highlighting its critical importance to project success.
4. Resource Allocation Problems
Effective resource management is essential for construction projects, which rely on the optimal allocation of labor, materials, equipment, and funds. Resource allocation challenges can significantly impact project timelines and budgets.
Common Resource Allocation Issues:
Resource Conflicts: Multiple activities competing for the same resources simultaneously
Skills Shortages: Lack of appropriately skilled personnel when needed
Material Management Problems: Delays in procurement, delivery, or quality issues
Equipment Availability Challenges: Insufficient access to necessary machinery and tools
Cash Flow Constraints: Financial limitations affecting procurement and payments
The table below illustrates how resource allocation issues can impact different project aspects:
Figure 3: Relative impact of various failure causes on construction projects
Measures to Ensure Construction Project Success
Understanding why projects fail is only valuable if that knowledge drives improvements. The following strategies address the common failure causes and help ensure project success.
1. Comprehensive Planning and Realistic Scheduling
Effective planning lays the foundation for project success by establishing clear objectives, realistic timelines, and appropriate resource allocations.
Success Strategies:
Thorough Scope Definition: Create detailed project requirements through stakeholder consultation
Work Breakdown Structure (WBS): Develop a comprehensive WBS to identify all required activities
Realistic Schedule Development: Use historical data and expert judgment to create attainable timelines
Resource-Loaded Scheduling: Incorporate resource availability and constraints into the schedule
Contingency Planning: Include appropriate time and budget buffers based on risk assessment
Comprehensive Risk Analysis: Evaluate both the probability and potential impact of each risk
Prioritized Risk Response Planning: Develop specific strategies for high-priority risks
Risk Monitoring System: Implement regular risk reviews and updates
Contingency Reserves: Establish appropriate time and cost reserves based on quantitative risk analysis
Risk management isn’t a one-time activity but an ongoing process that continues throughout the project lifecycle. Regular risk reviews and updates are essential as the project evolves and new risks emerge.
3. Effective Stakeholder Communication and Management
Clear, consistent communication helps align expectations, prevent misunderstandings, and ensure all parties work toward common objectives.
Success Strategies:
Stakeholder Analysis: Identify all stakeholders and their communication needs
Communication Plan Development: Create a structured approach for information sharing
Regular Progress Reporting: Establish consistent reporting mechanisms and frequencies
Collaborative Platforms: Implement tools that facilitate information sharing and collaboration
Feedback Mechanisms: Create channels for stakeholders to provide input and raise concerns
The following communication matrix illustrates how different stakeholders might receive project information:
Stakeholder
Communication Method
Frequency
Content Focus
Project Owner
Executive reports, face-to-face meetings
Weekly/Monthly
Progress against objectives, issues requiring decisions
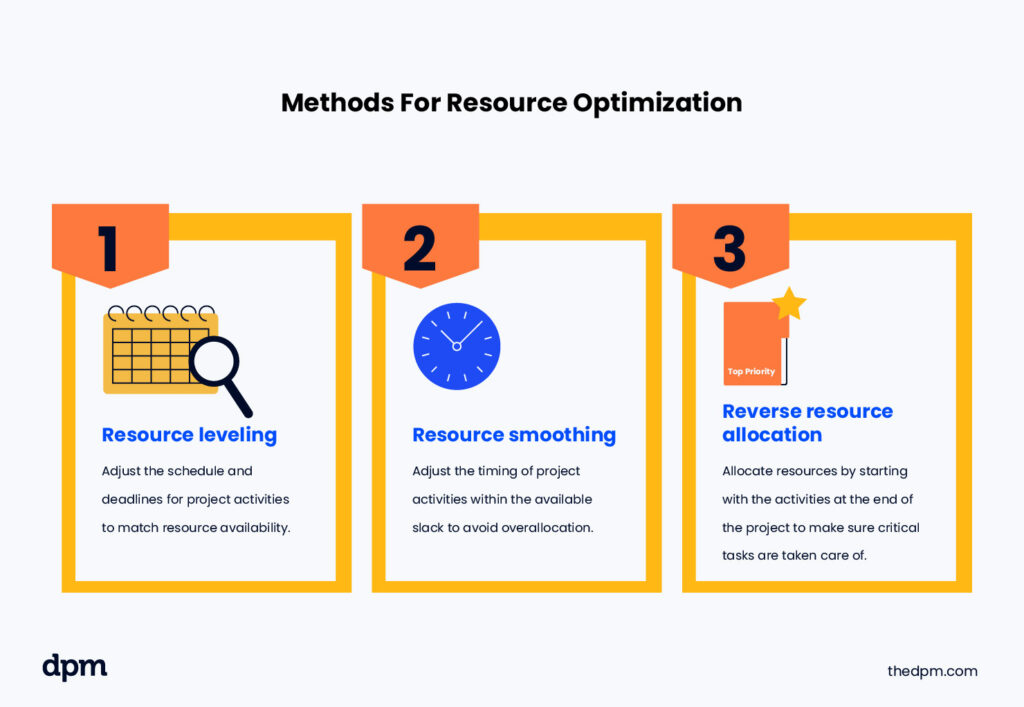
Figure 5: Framework for construction resource optimization
5. Integrated Control Systems
Comprehensive control systems help monitor project performance and identify deviations early, allowing for timely corrective actions.
Success Strategies:
Earned Value Management: Implement EVM to track schedule and cost performance
Quality Control Procedures: Establish rigorous inspection and testing protocols
Change Control System: Develop formal processes for evaluating and implementing changes
Performance Dashboards: Create visual tools to monitor key performance indicators
Regular Review Meetings: Conduct structured reviews to assess progress and address issues
Conclusion
Construction project failures rarely result from a single cause but rather from a combination of planning deficiencies, risk management gaps, communication breakdowns, and resource allocation challenges. By understanding these common failure points, project teams can implement targeted strategies to improve outcomes.
The measures outlined in this article address the root causes of project failures and provide a framework for success. By implementing comprehensive planning, robust risk management, effective stakeholder communication, optimized resource management, and integrated control systems, construction project managers can significantly improve their chances of delivering successful projects.
For students and practitioners of construction project management, these insights offer valuable guidance for navigating the challenges of complex construction projects. By learning from past failures and implementing proven success strategies, the construction industry can continue to improve project performance and deliver greater value to clients and society.