Mastering Energy Analysis in Revit: A Step-by-Step Guide for Sustainable Design
Table of Contents
Introduction:
Energy analysis in Revit: Regardless of your background in architecture, engineering, project management, or sustainability consulting, comprehending how to complete energy analyses is imperative in creating buildings that are both efficient and eco-friendly.
In this comprehensive tutorial, I will delve into the process of carrying out energy analysis in Autodesk Revit, step-by-step. Follow along with ease, even if you’re new to this field, as I try provide a detailed account of each component. Hence, you’ll find it to be a valuable reference throughout your professional journey.
Understanding the significance of conducting energy analysis in Autodesk Revit is crucial for building professionals. It allows for informed decision-making during the design process, ensuring the creation of structures that minimize energy usage while maintaining comfort and functionality.
This article aims to serve as a complete guide to performing energy analysis in Autodesk Revit. In doing so, I hope to equip you with the necessary knowledge needed to create energy-efficient buildings that cater to the needs of society while reducing carbon footprints. Bolster your journey towards a greener future with this article.
What is Energy Analysis in Revit?
Energy analysis in Revit is a powerful feature that allows designers to simulate a building’s performance and evaluate energy consumption and costs. By integrating this analysis early in the design process, you can make informed decisions that lead to more sustainable and cost-effective projects.
Why Perform Energy Analysis?
Performing energy analysis during the design phase can help identify the best strategies for energy conservation, leading to reduced environmental impact and lower operational costs. It’s an essential step for achieving green building certifications like LEED and BREEAM.
Getting Started with Energy Analysis in Revit
Before diving into the energy analysis, ensure that your Revit model is properly set up with accurate building and environmental data. This includes specifying the building type, location, and materials.
Step 1: Preparing Your Model
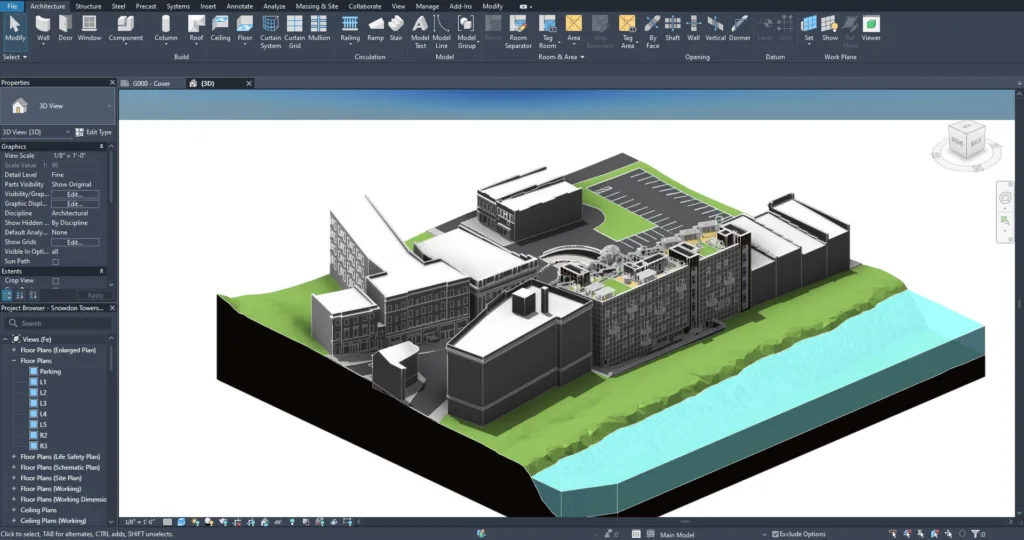
Begin by refining your Revit model to accurately reflect the intended design. Ensure that the building geometry, orientation, and site conditions are correctly represented.
Step 2: Accessing the Energy Analysis Tools
Navigate to the ‘Analyze’ tab in Revit to access the energy analysis tools. Here, you’ll find options to generate and optimize your energy model.

Step 3: Setting Up the Energy Model
Click on ‘Energy Settings’ to specify the building type and location. This information is crucial for accurate analysis as it influences factors like weather data and energy codes.

Step 4: Generating the Energy Model
Create a new energy model by clicking on ‘Create new.’ Revit will process the information and prepare it for analysis.

Step 5: Analyzing the Model
Once the model is generated, it will be uploaded to the cloud for analysis. This step may take some time, depending on the complexity of your model.

Step 6: Reviewing Optimization Strategies
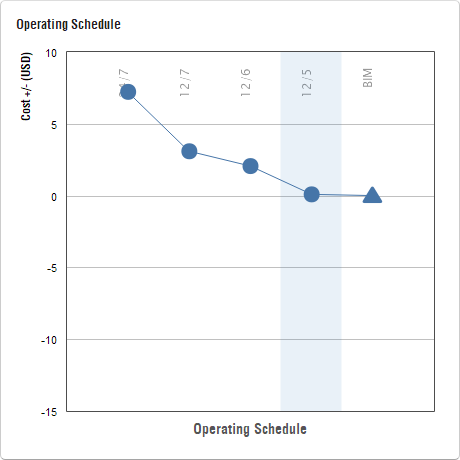
After the analysis is complete, explore various optimization strategies to improve energy efficiency. This could include adjustments to the building’s envelope, mechanical systems, or the use of renewable energy sources.

Step 7: Generating the Energy Analysis Report
Finally, generate a comprehensive report that includes the analysis results and recommendations for energy optimization.
With this information, decision-makers can make an informed choices on how to improve the organization’s energy usage and overall efficiency.


Conclusion:
Energy analysis in Revit is a game-changer for sustainable design. By following the steps outlined in this guide, you can leverage this powerful tool to create buildings that are not only aesthetically pleasing but also energy-efficient and environmentally responsible.
Remember, sustainable design is not just about meeting regulations; it’s about creating a legacy of responsible architecture that contributes to a healthier planet. A single unit of energy saved by efficient design today, compounds to 50-60 years (Average life of a commercial building today) of Energy Savings!!
Further Reads:
External References:
[1] A Quick Introduction to Insight & Revit’s Energy Modeling (Autodesk)
[2] Energy Optimization Analysis using Autodesk Revit & Insight + Generating the Report template
[3] Comparing Conceptual Energy Analysis Results in Autodesk Revit Architecture
If you are interested in reading further about BIM for Analysis:
[1] https://venunataraj.com/bim-for-building-energy-analysis-management-importance/